Concise Byron Bay Photography Guide
What is this place?
Byron Bay is a quaint little town on the Eastern oceanfront of Australia. Located near the northern border of the state of New South Wales (NSW), it stretches comfortably for a few miles along the Coast, offering a perfect exposure to the water and the waves.
At its core, Byron Bay is a surfing community, but there is more to it than that.
7am – Coffee, 8am – Surf, 10am – Coffee, 11am – Surf… – reads the menu board outside one of many Byron Bay’s cafés. It is accurate: aussies are renowned coffee addicts, and avid surfers. For them, a visit to Byron Bay may well boil down to those two activities.
Non-surfers flock to the Bay for its laid back vibe and hipster culture. Live musicians play stringed instruments in the streets and on the beach providing a good subject for street photographers. Caravans clog parking lots, tattooed surfers roam about in crowds, and a faint smell of weed lingers in the air in some spots. It’s a unique getaway from the hustle and bustle of the big city. An artist can be himself here.
The typically small population of Byron Bay is inflated during the Peak Summer Season and the Australian schoolies – end of term school holidays. This leads to a rise of rental costs for holiday homes, hotels and hostels.
Backpacker dormitories are hugely popular among budget visitors. They dominate Byron’s town centre and rely on the peak season to drive the bulk of their annual revenues. Plan your trip to avoid schoolies to enjoy fairer prices and smaller crowds.
3 main backpacker hostels of Byron Bay are :
Aquarius Backpackers – popular for its proximity to the beach
YHA Byron Bay – further away from water, they are an Australian chain
Nomads Backpackers – close to the beach and ALDI supermarket
None of them are really great, and surprisingly none are cheap either.
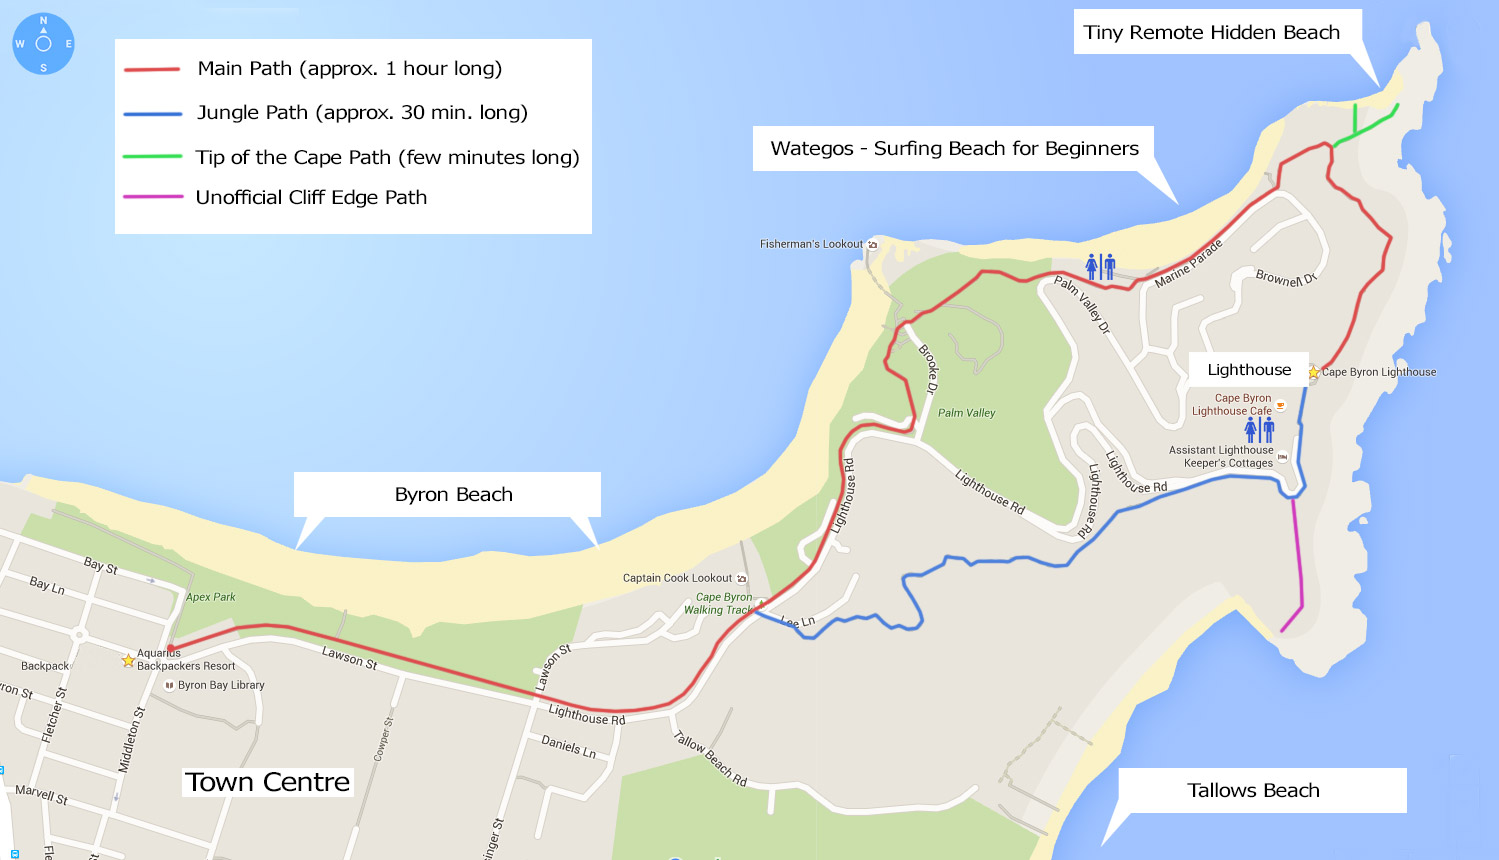
The Lighthouse Walk
The symbol of Byron Bay is a clifftop Lighthouse, visible from from the Byron Beach. And while interesting to explore, the walking trails leading up to it are even more compelling.
There is a number of foot paths to the top, both official and unofficial. Each one offers something different and unique in terms of difficulty, length and photographic opportunities. An adventurous photographer, equipped with enthusiasm and plenty of liquid, will find a lot of variety along the way – beaches, breaking waves, sweeping vistas, sunbathing lizards and more.
The Byron Bay Walking Path Map below demonstrates the main trails on offer, feel free to download and share it.
The Main Lighthouse Walk (marked in Red on the Map) starts in the town centre, stretches along the main beach, continues to Wategos Beach and ends with a lengthy climb to the Lighthouse. Its estimated completion time is 1 hour and it’s an absolute must for a wholesome Byron Bay photography experience. You can take the same path for your return journey, but I would strongly advise making your way back along the Jungle Path (described below) which takes you back though a thicket of vegetation.[dt_fancy_separator
Jungle Path can be either the beginning or the end of the trail. It is fully sheltered with thick vegetation and is extremely moist. Prepare to get sweaty while trudging through this muddy trail, but the experience is totally worth it. One time I saw a 5-foot lizard resting inside a dapple of light, in the middle of the path. I took a photo and waited for it to move away before carrying on. The Jungle Path also offers access to the Tallows beach, but it is hard to find and navigate with its steep and narrow trail though thick vegetation.
Tip of the Cape Path (not its official name) is short and sweet. It deviates from the Main Path and in just a few steps brings you to the rocky shore and a Hidden Beach, which is less known and is usually empty. Broken tree trunks, rocks and shells create for a very nice subject against the sand and sea backdrop.
Cliff Edge Path is not officially a path, and is in fact beyond the safety fence of the observation platform up top. Its a “proceed at your own risk” type of trek, and I would not advise attempting it on a windy day. However, if you are a rule-breaker like me, go ahead and try it for an exclusive perspective on the lighthouse and its surroundings.
TIP : I found that the most effective way to explore all of the trails is by combining them into a loop: starting with the Main Path, detouring on the Green Path, and finishing with the Jungle Path that leads back to the Main Path and back to town. You can complete the entire journey in reverse too, and it’s well worth it.
Timing is everything
 The Lighthouse Walk is challenging even without photographic equipment on your back. On a hot sunny day, plan your trip beforehand, as the sun will be your enemy during your trek. I suggest waking up just before sunrise to prepare and set off as the sun begins to rise. In the summer, the rays start pounding you with heat at around 9am, so setting off between 7am and 8am is ideal.
Byron Bay photography trip wouldn’t be complete without Sunset shots. When the sun starts going down the heat is less problematic, your photos will be rich with twilight colours. Just make sure not to get caught on one of the paths when its dark – there are no lights and you’ll find yourself alone in pitch black.
TIP: Try to wake up before sunrise and make your way to the beach. Bring your camera and capture a beautiful Virgin Sunrise. As the sun begins to rise above the Date Line, you will be among the first people on the planet to welcome and capture the new day, many hours before your European or American friends.
At the Top
Mission accomplished – you’ve survived the walk. So now what?
 At the top of the hill you will find the famed Lighthouse with its alabaster white surface, sitting on an observation platform with an unobstructed sweeping view in all directions.
Few steps away from the Lighthouse is the Cape Byron Lighthouse Café and a free public toilet where you can relax and recharge. Feel free to roam about as there are plenty of photographic perspective facing both toward and away from the Lighthouse.
Once recharged and relieved, carry on South toward the Jungle Path. Just before you reach the main road, there is a platform with a free telescope facing South and a splendid view of Tallows Beach stretching out for 5 miles.
If you happen to feel adventurous, jump the fence and head down the Cliff Edge Path, leading to the very tip of the hilltop. Just make sure you have proper shoes – I wouldn’t try this in flip-flops.
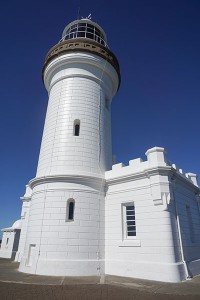
Get your swimming gear out!
 Your Byron Bay photography experience doesn’t have to be all work and no play. Even a serious photographer, dedicated to capturing unique imagery, will feel the temptation to wet his feet in the Byron Bay waters along the way.
The Lighthouse Walk offers an unmissable opportunity to deviate from your original snapshot mission to have a revitalising swimming session, or simply lay on the sand. Just remember – Australian sun is Very Strong and can quickly burn and damage your skin. Always bring plenty of sunblock and apply it multiple times through the day. Last thing you need is a sunstroke prematurely ending your Byron Bay photography escapade. Wearing a baseball cap or a large brim hat is also a great idea.
And of course, make sure to grab your swimming gear, and maybe even a towel if you don’t mind the extra weight – the beaches await!
What’s in My Bag?
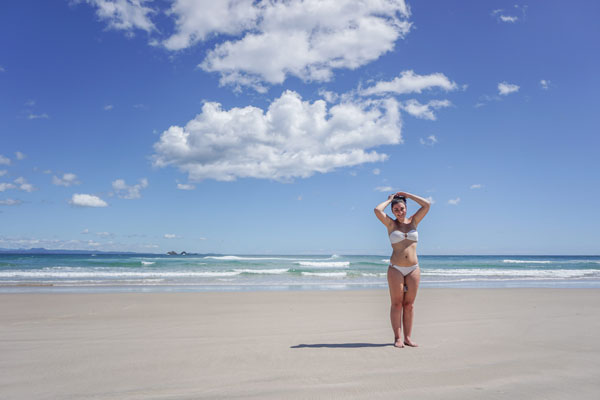
 When photography is not the main objective of the trip, I subscribe to the Travel Light philosophy.
My Byron Bay photography equipment consisted of Sony a6000 mirrorless camera with its kit zoom lens that fits snugly into a neoprene pouch, a plastic gorillapod (aka octopus tripod) and a wireless shutter release for remote triggering.
The rest of the bag was full of non-photography “stuff”: swimming trunks, a towel, sunglasses, sunblock and a water bottle. Ironically, the bag housing it all is not a photography bag – it is an unassuming cloth bag that is compact and light, adding very little weight burden. With no inner padding, I had to rely on the neoprene pouch I had mentioned to keep the camera safe from damage.
My Byron Bay Photography Gallery
Here are the best shots from my Byron Bay Photography trip in the summer of 2015


